In this article, we’ll take a look at some common causes of uncaught syntaxerror unexpected token imports and how to solve this pesky error.
Category: Development
-
Nginx 413 Request Entity Too Large Error
Error: 410 “Request entity too wide” for NGINX – Client_max-bodysize : Change to nginx.config file. The problem occurs when your nginx server cannot upload files larger than specified size in the nginx configuration file. The answer will require changing the default configuration of nginx.
How do I fix Nginx 413 Request Entity Too Large?
I use nginx on an Apache+modfastcgi server, but this solution is related to your nginx server; otherwise, I have your solution to this issue when you receive: Apache 413 request entity too large error. My application allows importing and sharing pictures up to 1MB in size. The following error message appears if an image is uploaded with NGINX 413 Reverse Proxy. This error is triggered when a website is configured to restrict large file volumes. Nginx allows maximum size on client request bodies through Client’s max_body_size directive in your etc nginx nginx.conf.
How do you handle 413 payload too large?
In this case, Nginx throws a 413::request entity. This will not send your requests to your ExpressApps. Client_max_body_size 50M in nginx configuration OR server configuration.
If this doesn’t help try Nodejs 413 request entity too large errorError: 413 “Request entities too large” in NGINX if Client Max Body Size is exceeded in NGINX configuration file. This occurs as your nginx servers cannot upload files whose size exceeds the defined size in the nginx configuration files. For that problem nginx requires modifying its configuration settings.
Nginx Server
Nginx server settings will be set in a new file nginx.conf. Activate this file to see client_Max_body_size. Make sure it has a value (megabyte) for the maximum file size you want. Those who don’t see these commands in the config can add them to the end of servers, places or HTTP blocks like this: This permits 64-megabyte downloads. Specify your preference and save the file before loading Nginx.
Nginx configuration
For a quick solution, edit the nginx.conf file. Open Terminals or log on to remote servers via ssh clients. Use this command to edit nginx.conf with text editors e.g. vi or joe, or nano: # vi /etc /nginx.conf. Use nano Text Editor: sudo nano /etc nginx/.
[code]
server {
server_name example.com;location / {
proxy_set_header HOST $host;
proxy_set_header X-Forwarded-Proto $scheme;
proxy_set_header X-Real-IP $remote_addr;
proxy_set_header X-Forwarded-For $proxy_add_x_forwarded_for;proxy_pass http://127.0.0.1:8080;
client_max_body_size 20M;
}listen [::]:443 ssl ipv6only=on;
listen 443 ssl;
ssl_certificate /etc/letsencrypt/live/infohob.com/fullchain.pem;
ssl_certificate_key /etc/letsencrypt/live/infohob.com/privkey.pem;
include /etc/letsencrypt/options-ssl-nginx.conf;
ssl_dhparam /etc/letsencrypt/ssl-dhparams.pem;}
[/code]How do I fix NGINX 413?
The error occurs when the user requests an entity too large in nginx when the client has a “client_max_body” change in Nginx configuration. This happens if your nginx server can’t upload files that exceed the specified size in nginx’s configuration files. The problem is resolved with changing nginx configuration.
What is client_max_body_size in NGINX?
The upload limit is 512MB and the maximum is 1GB for the file. When you modify client_max_body_size you can increase the amount of uploaded files on your site. Use HTTP servers or local blocks for client maximum_body_size editing. This change in HTML block is applied for the entire virtual host.
The standard NGINX is limited to 2MB per file. By editing client_max_body_size, increase upload size. Use http server or location blocks for editing clients_max. Body size. Change to the http block affects every virtual host in the server block.
Reference: Limit File Upload Size in NGINX
-
Understand JavaScript Events with Examples
JavaScript has many built-in functions that allow you to create custom events. In this article, we’ll take a look at some of these functions and see what they do.
-
Netsuite API Developer’s Guide
With the help of the Netsuite API, developers can build their own apps or integrate existing ones into Netsuite. In this article, we’ll show you how to do both.
-
How to return a CSV file using C#
ASP.NET Web API is a framework that is built upon the MVC (Model View Controller) principal to assist in rapidly building a RESTful API using the .NET framework.
By default Web API makes it easy to return common HTML content types, such as: JSON and XML. However, it requires a little bit more work to return a CSV file using Web API. Read on to learn how to write to csv c#.
Return csv file from REST API c#
Getting started with a CSV Web API Project
To begin, I am going to create a new C# Web Application using Visual Studio Express named CsvWebApiExample that will allow downloading of CSV files using C#.
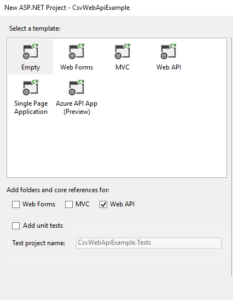
Once Visual Studio has finished creating my new project (I chose Empty and selected the Web API reference) I am left with a bare bones project that I can begin fresh with how to create a csv file in c#.
To start, I will create a basic controller and demonstrate how Web API will automatically serve up several different content types automatically.
In Visual Studio, right click the Controllers folder and create a new folder called Api. Visual Studio created a route for us that will automatically load controllers that are contained within the Api folder to download csv file from web api c#.
Creating a Controller for returning CSV files
Generate CSV C#
Inside this new folder, right click and create a new Controller. I will call mine CsvController. I want to have full control over what my controller looks like so, when adding the new controller, I selected the Web API 2 Controller – Empty. Below is an example of a basic controller returning a list of CsvViewModels (to be created) that contains several basic properties that I want to return in my CSV file.
using CsvWebApiExample.Models;
using System;
using System.Collections.Generic;
using System.Dynamic;
using System.Linq;
using System.Net;
using System.Net.Http;
using System.Web.Http;
namespace CsvWebApiExample.Controllers.Api
{
public class CsvController : ApiController
{
public List Get()
{
return new List
{
new CsvViewModel
{
FirstName = "John",
LastName = "Doe"
}
};
}
}
}
Before running this example a model needs to be created that is returned as the results of the Get method created above. Right-click on the Models directory and create a new class called CsvViewModel. The contents are below for a csvwriter c# example:
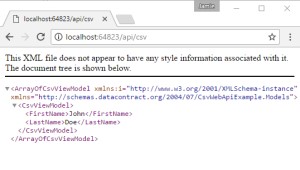
namespace CsvWebApiExample.Models
{
public class CsvViewModel
{
public string FirstName { get; set; }
public string LastName { get; set; }
}
}
The CsvController returns a list of CsvViewModels that contain a FirstName and LastName for a csvfilewriter c#. The project can now be run. It should launch your default web browser. At the end of the URL add “/api/csv” (without the quotes). As you can see from the screenshot below, the Web API framework automatically serves an array of CsvViewModels in XML format or csv to json c#:
Comparing Web APIs different response types
With the web application still running, I’m going to use Fiddler (a free application to trace and execute web requests) to use c# return csv file. When the application first runs, it will begin capturing traffic by default. If you reload the web page that was displaying XML, Fiddler will capture the request allowing me to re-issue this web request supplying a different content type to write CSV files for you.
After re-running the request in the web browser, Fiddler should have captured the result as follows for your CSV file:
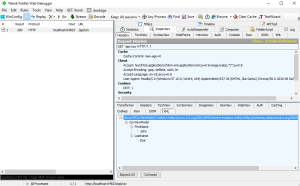
Once again, the result is XML. Let’s re-issue this request, but explicitly set the content type to JSON. Right-click on the request and select Replay -> Reissue from Composer to convert c# json to csv.
Replace this line: Accept: text/html,application/xhtml+xml,application/xml;q=0.9,image/webp,/;q=0.8
With: Accept: application/json for the content disposition to use c# create csv
Then select the Execute button. Fiddler will display a new line in request list. Double click the latest result and you will see that Fiddler detected the results were JSON:

Once again, the Web API was automatically able to detect the requested content type and serve up the results appropriately for us with asp.net core export to csv.
Setting up your own “Accept: text/csv”
If I wanted to request a CSV file, I would change the previous “Accept: application/json” with “Accept: text/csv” for the content disposition. After making this change and re-executing the request, Fiddler returns a new result. Unfortunately, it was not automatically formatted as a CSV file; my Web API application, once again, returned JSON when writing the response.
To make my Web API application understand the “text/csv” content type, I need to create a new Formatter. The Formatter is added in the Global.asax.cs file that is contained in the root of the project. Below is my updated Global.asax.cs file:
using System;
using System.Collections.Generic;
using System.Linq;
using System.Net.Http.Formatting;
using System.Web;
using System.Web.Http;
using System.Web.Routing;
namespace CsvWebApiExample
{
public class WebApiApplication : System.Web.HttpApplication
{
protected void Application_Start()
{
GlobalConfiguration.Configure(WebApiConfig.Register);
GlobalConfiguration.Configuration.Formatters.Add(new CsvFormatter(new QueryStringMapping("format", "csv", "text/csv")));
}
}
}
Understanding the CsvFormatter
The new line I added was to instantiate the CsvFormatter class (to be created next) and telling the formatter to respond to text/csv content type.
Before we can compile, the CsvFormatter class needs to be created. I created the CsvFormatter class in the root of the project (so the Global.asax.cs can access it), its contents are below:
using System;
using System.Collections;
using System.Collections.Generic;
using System.IO;
using System.Linq;
using System.Net.Http;
using System.Net.Http.Formatting;
using System.Net.Http.Headers;
namespace CsvWebApiExample
{
public class CsvFormatter : BufferedMediaTypeFormatter
{
public CsvFormatter(MediaTypeMapping mediaTypeMapping)
{
MediaTypeMappings.Add(mediaTypeMapping);
SupportedMediaTypes.Add(new MediaTypeHeaderValue("text/csv"));
}
public override bool CanReadType(Type type)
{
return false;
}
public override bool CanWriteType(Type type)
{
if (null == type)
return false;
return IsTypeOfIEnumerable(type);
}
public override void WriteToStream(Type type, object value, Stream stream, HttpContent content)
{
CsvStreamWriter.WriteStream(type, value, stream);
}
private bool IsTypeOfIEnumerable(Type type)
{
foreach (Type interfaceType in type.GetInterfaces())
if (interfaceType == typeof(IEnumerable))
return true;
return false;
}
}
}
The CsvFormatter class that creates a new csvwriter extends the abstract class BufferedMediaTypeFormatter as a nice csvhelper. The abstract class (and its parent) require three functions to be implemented: CanReadType, CanWriteType, and WriteToStream.
The CanReadType simply returns false because we are not planning on reading CSV as input, only returning it as output. The CanWriteType ensures the object is not null and if it is not null, it asserts that the object is of type IEnumerable. This is important because when the CSV is being written, the code assumes that the CSV results will be a list of objects.
The final function, WriteToStream (that uses a new streamwriter), is what actually takes the object, converts it to a string of content and writes it back to the result stream. To make the code more readable and potentially more reusable in the future, the WriteToStream function is a wrapper to call another class the performs the magic: CsvStreamWriter.
Using new streamwriter to return CSV files
Understanding the BufferedMediaTypeFormatter to return CSV
Once again, I created the classs CsvStreamWriter in the root of the project. The contents of this file are displayed below:
using System;
using System.Collections.Generic;
using System.IO;
using System.Linq;
using System.Web;
namespace CsvWebApiExample
{
public class CsvStreamWriter
{
public static void WriteStream(Type type, object contents, Stream stream)
{
Type itemType = type.GetGenericArguments()[0];
using (StringWriter stringWriter = new StringWriter())
{
// Write the list of property names on the first line
stringWriter.WriteLine(string.Join(
",", itemType.GetProperties().Select(x => x.Name)
)
);
// Loop all objects and write their values
foreach (var obj in (IEnumerable<object>)contents)
{
var values = obj.GetType().GetProperties().Select(
pi => new
{
Value = pi.GetValue(obj, null)
}
);
string valueLine = string.Empty;
foreach (var value in values)
{
if (value.Value != null)
{
string val = value.Value.ToString();
//If any double quotes, escape them
if (val.Contains("\""))
val = val.Replace("\"", @"""""");
//Check if the value contains special characters
if (val.Contains(",") || val.Contains("'") || val.Contains("\""))
val = string.Concat("\"", val, "\"");
//Replace any \r or \n special characters from a new line with a space
if (val.Contains("\r"))
val = val.Replace("\r", " ");
if (val.Contains("\n"))
val = val.Replace("\n", " ");
valueLine = string.Concat(valueLine, val, ",");
}
else
{
valueLine = string.Concat(valueLine, ",");
}
}
stringWriter.WriteLine(valueLine.TrimEnd(','));
}
using (var streamWriter = new StreamWriter(stream))
streamWriter.Write(stringWriter.ToString());
}
}
}
}
The class uses Reflection to dynamically build a string of data. The CSV headers (the names of the object properties, e.g. FirstName, LastName) are written on the first line. The object is then looped through and each property’s value on the object are written, comma delimited. One object per line. This is then written to the stream and returned in the Web API response.
Now, after I build the project, when I reissue the last request in Fiddler (where the Accept HTTP Header is set to text/csv), the results are no longer returned in JSON.
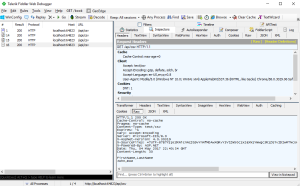
As you can see in the raw results a CSV file is being streamed back with the property names as the header and one line per object in the list of CsvViewModels.
To test opening it as a CSV, in Fiddler right-click the request and select Save -> Response -> Response Body. Fiddler will then prompt you to save the file with a name and extension. You can choose something like csvexample.csv and select a folder to open it in.
The full source code of this example project is contained on GitHub: https://github.com/endyourif/CsvWebApiExample.